[79FT]: Building Things |
 |
Baffle Seals
...are baffling!
| On: | Mar 13, 2021 |
| In: | [Chickenhouse Charger] Electrical Rebuild |
| Time logged: | 20.5 |
| Tags: | 6781G, MA5 Charger, FWF, baffles, engine |
One last thing identifiable as a "sub-project" left! Also, the most annoying thing probably.
Baffle seals.
The old ones were cruddy, petrified, and worn. In fact, baffles were what I was working on when I discovered that I needed to rebuild the electrical.
So I guess it made sense to finish where I started.
I pulled the old ones out of their bag, looked thru my notes of what goes where, and put them back up.
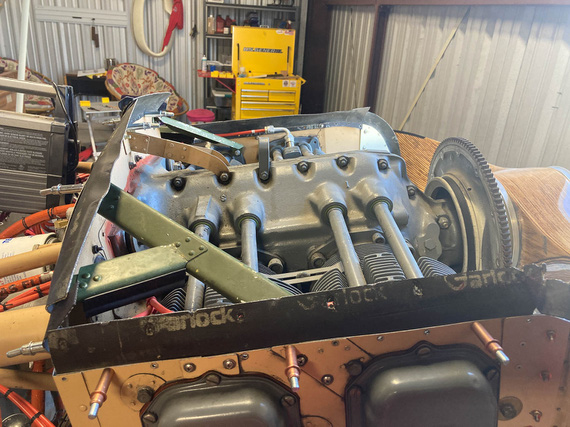
Old baffle seals back on
And then, duplicating and tweaking.
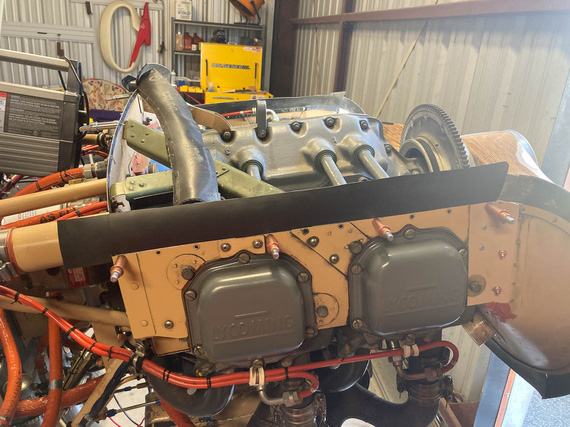
New seal fitting
Weirdness number one - or rather, unusualness? - was how Remo hooked up the nosebowl. On most airplanes (and on the plans as well!) the nosebowl is just held by the rest of the cowling.
On this Charger, Remo decided to hold it on four U-channels bent out of aluminum going from the firewall to the nosebowl. Those U-channels would also act as cowl stiffeners.
Here's one of them, on top of the engine baffle.
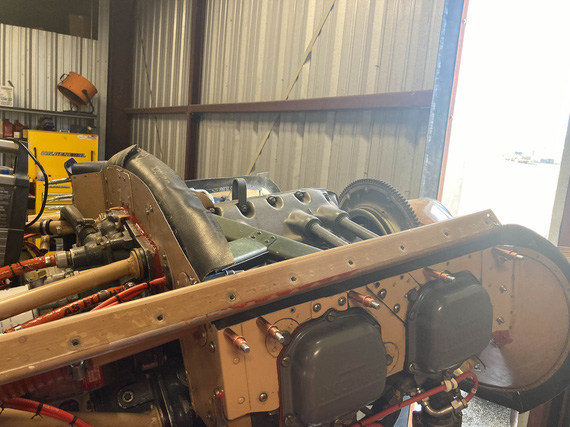
Hosebowl support C-channel
I even think I know why. He probably attached the nosebowl to the flywheel with some kind of a jig, lined everything up the way he liked, and made those.. stringers? I'll call them stringers. In place. That held the nosebowl, and he could build the rest of the cowling around them.
Problem?
Well, the two on the top have to go "thru" the "airbox" that's created between the motor and the top cowl, making two nice holes in it - and allowing air to escape thru them rather than be forced down thru the cylinders.
Here you are looking towards the firewall thru one of those hose.
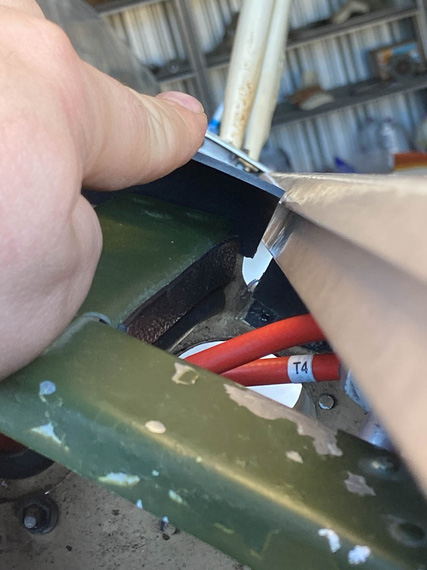
Hole
I pondered this for a while, asking Mr. D. if on his Eagle he built he had anything like that. He said no; his cowling was "normal". No "stringers". I thought about making some small strips and attaching them to the "stringers" to plug these holes. I thought about maybe filling them with RTV (making those stringers' removal a fun affair).
At the end, decided that for now, I am going to ignore it. There are much larger "takeoff" holes right there - for the oil cooler on one side, and for the fuel pump on the other. So, there.
The other problem was that instead of using standard 1/8" large-head pop rivets almost everyone uses to attach the seals, Remo decided to be "frugal" (weight savings?) and used 3/32" rivets on the back baffle. He used 1/8 rivets on the side baffles alright; but instead of using large-heads, he drilled the holes too close to the edge and used a "retaining strip" - basically, a narrow piece of aluminum on the "rubber side" that acted as one long washer.
That's all good, but of course they were old, torn to pieces due to vibration, and basically all broke up when I removed the old baffles.
I toyed with the idea of using large head rivets or emulating them with washers.
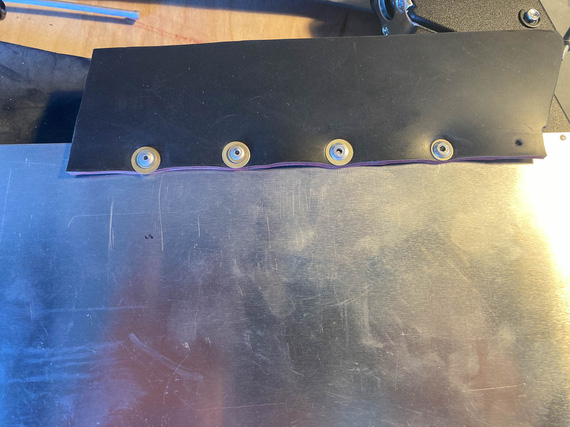
Large head rivets emulated with washers.
Talking to Mr. J.F., one of the IAs on the field, he seemed fine with that. Mr. D of that Eagle fame said it was a good idea too. Mr. J.F. said, "baffles are baffling", by which unwillingly contributed to the subtitle of this rant.
In the end, I ended up remaking the retaining strips.
Why?
Because the holes were too close to the edge. A larger diameter rivet or washer will "poke in" to the seal when it bends down, and quickly cut a slot in it. The seal will tear up, and.. well, that's the end of that seal.
So, the strips.
Using old ones as templates to replicate was out of the question - they were too beat up. So, the second best option? Make them in place.
First, the holes.
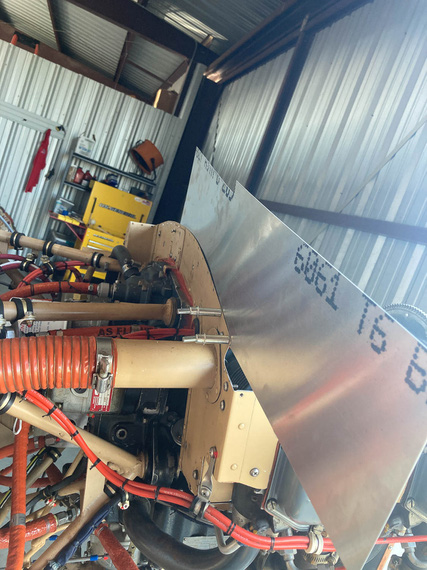
Drilling holes to match
Then, I would draw the edge onto the metal and take it off...
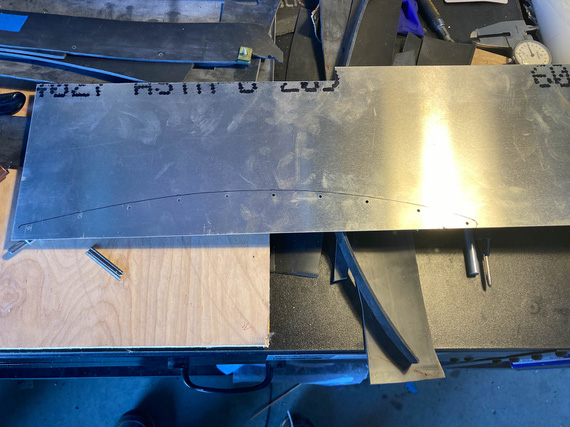
Top edge duplicated
... cut it, and put it back on to make sure the edges would match up
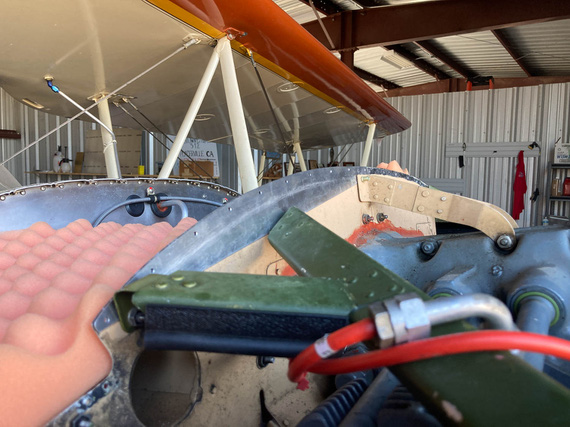
Test fit
The bottom edge would be duplicated off of the top edge using a compass, and - voila:
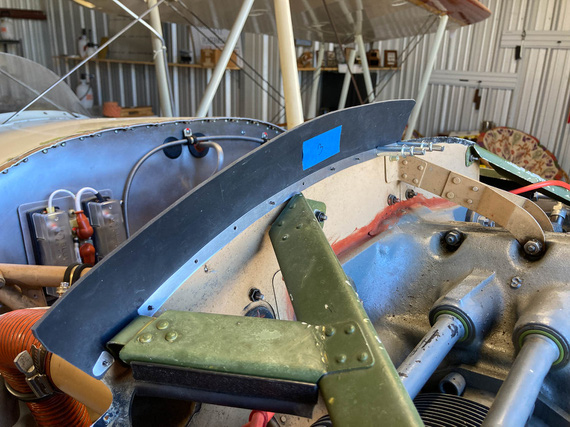
The new strip
The strip would be done.
And that, all around.
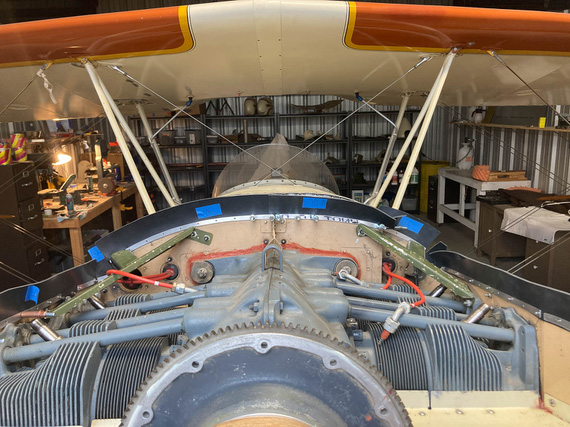
New retaining strips
Final test would be making sure it fit with the cowling - didn't pinch anything anywhere...
Except that...
Funny story. The top piece of the cowling was standing upright (grave mistake!) on the top of a shelf in the back of the hangar. For a year, or probably even more.
And then, one day, it did catch a particular gust of wind that so rudely entered the premises, couldn't stand the offense, and fell down.
WHACK! I heard.
First thought: "Please, not on the airplane!". No, it didn't fall on the airplane.
But it did mess itself up.
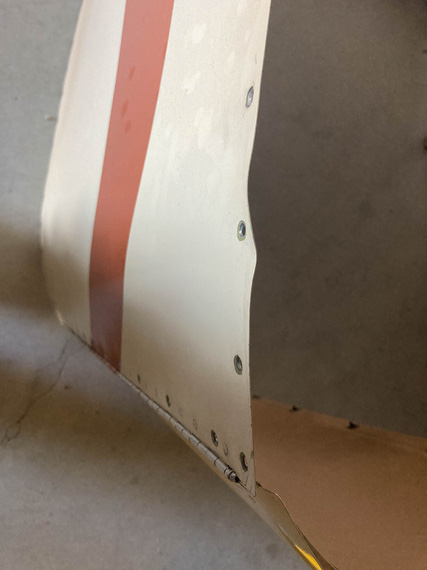
Bent cowl
So I guess I learned my lesson at not to steep a price.
Mr. M, the same Mr. M that welded my exhaust tailpipe back on made quick work of it with his very fancy shrinker.
The cowling went on, and I confirmed that everything would fit - because next, the seals would be riveted permanently.
Then, Mr. M decided to join me. He'd pull a Cleco, and I'd pop a rivet...
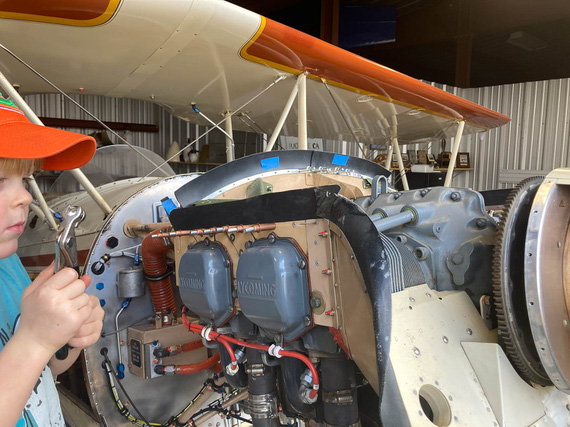
Riveting
...and, we were all done!
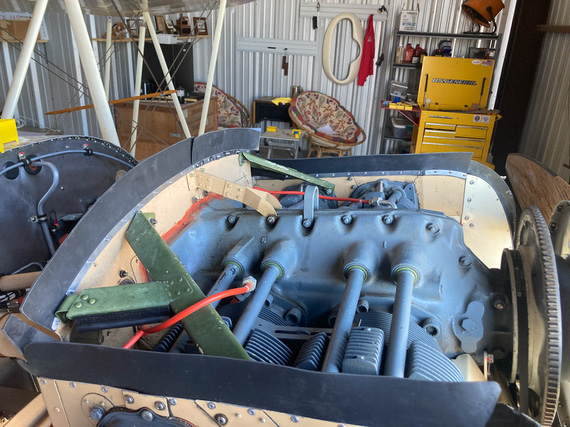
Done
Some final passes with RTV to patch up some holes between the metal and the motor, and I call this good to go.
CAUTION: Aviation may be hazardous to your wealth.
Up ↑
Annual 2019: The Cowling Conundrum
...Comanche, no Comanche?
| On: | May 15, 2019 |
| In: | [Chickenhouse Charger] 2019 Annual |
| Tags: | 6781G, MA5 Charger, Annual, baffles |
Baffle seals on this plane are original reinforced neoprene rubber, and they were in pretty beat up shape. There is a lot of gaps, they sag in places, making the seal really not that good.
So one of the things I decided to do is to redo them.
Pardon the cruddy pictures; but those ones are the only ones I have :(
The Nosebowl
One of the things I noticed immediately is that baffle seals were turned the wrong way in the nosebowl area; where the front "air ramp" joins the bottom of the nosebowl.
Here's the nosebowl and the front ramp:
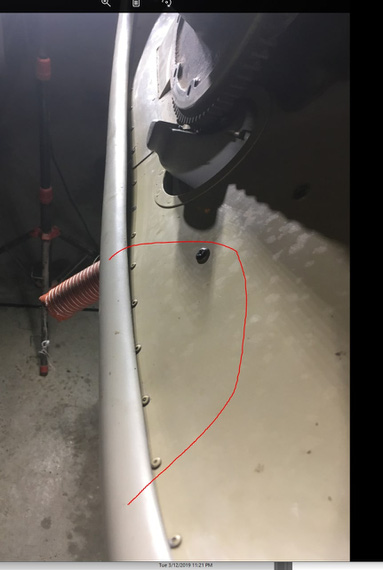
Front ramp
Notice the circled area? Here it is, from the back:
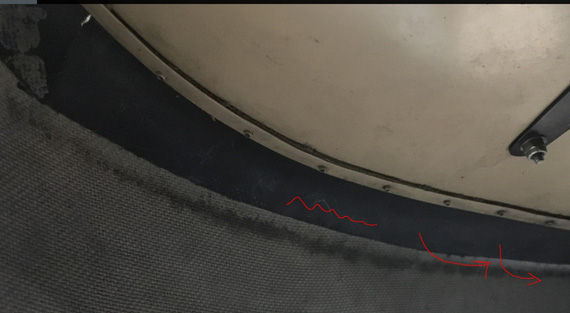
The behinds
That marked rubber seal is in the circled area. Notice it's turned the wrong way; "into" the cowling, rather than away from it? Ram air hitting that front "ramp" will "bend it in", and leak into the underside of the engine compartment - precisely where it's not supposed to go.
Naive me thought that it was just wrongly installed - the rubber needed to have been folded up and out, "into" the lip of the nosebowl.
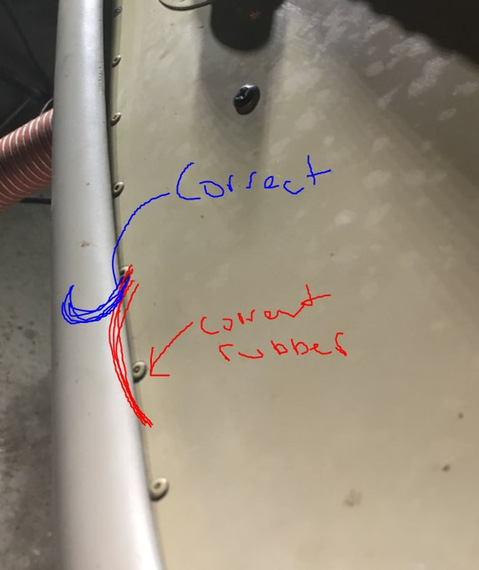
Correct and current seal orientation
Ha! Well, Remo (the guy who built the Charger) thought different.
There's just not enough room there. Everything is super tight. The seal just won't go there and stay there. There's just no room.
Look at the above two pictures - inside and outside - again. You'll understand why. Use pop rivet line as your reference.
Here's where the problem gets worse. Ramp is really thin - so with just a mild pressure, I can make that gap between the ramp and the bowl 1/4 - 3/8 inches. Guess what happens when ram air hits it... :)
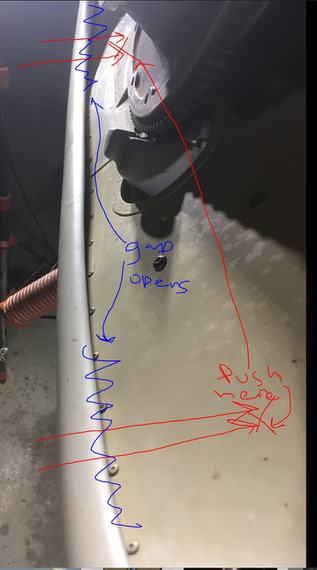
What ram air does...
Okay, so then I went digging.
I thought this was a standard bowl. I was right!
It's an old Comanche single style bowl (I think).
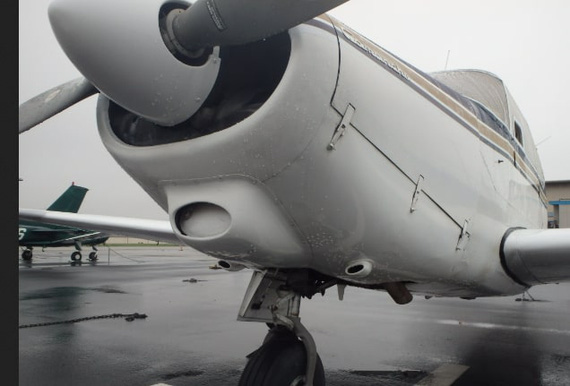
Comanche nose
Looks similar? I researched further.
Here's a guy making replacement ramps for Comanches, with some good pictures.
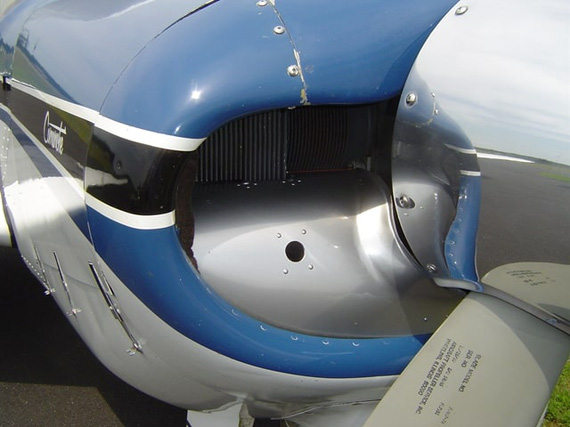
Front ramp on a Comanche
Okay; see the difference? Comanche ramps are curved the other way.
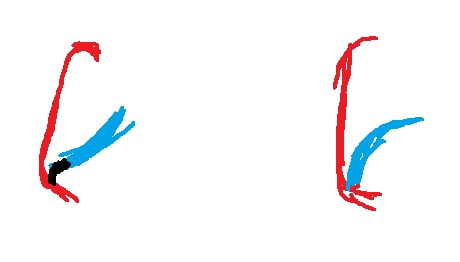
Changer vs. the Comanche
This is cross section. Mine's on the left, Comanche's on the right. Red is nosebowl; blue is this ramp, and black is my baffle seal.
Mine is "concave". Comanche is "convex". So if I got my thinking right, this makes the Comanche version more rigid facing the wind.
Drawing from the Comanche's parts' manual confirms this proper curve.
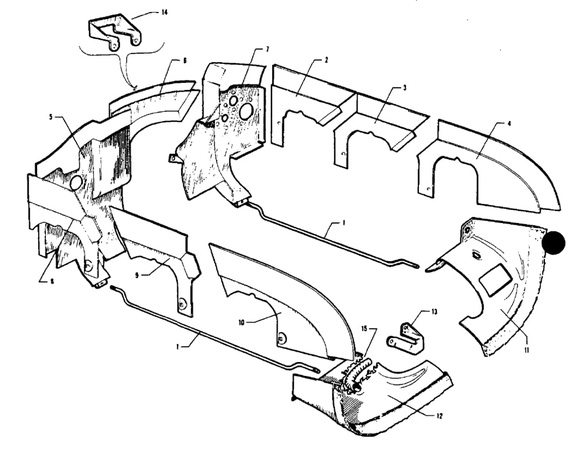
Comanche parts manual on baffles
The parts I'm talking about are numbers 11 and 12, bottom right corner.
But how the heck do they seal them? Notice that the material on the drawing above seemingly has some "dots" on it (as opposed to the rubber material on the side baffles).
Well, back to our "remade Comanche front baffles" guy.
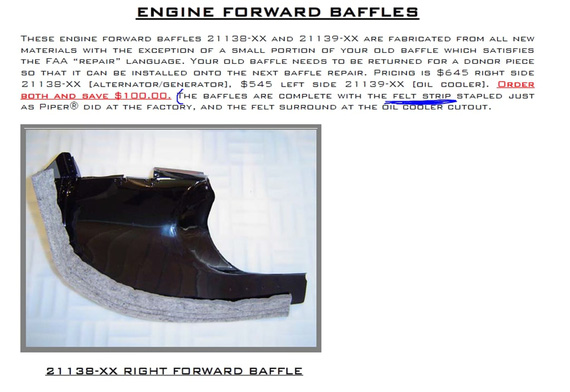
Forward baffles from Comanche Gear guy
Felt strip!
Well, I guess that makes sense. Felt wrapped around the front ramp.
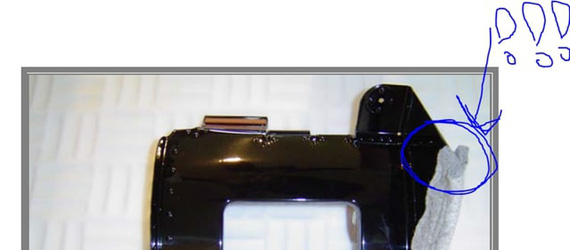
Felt strip
Felt is thick and, contacting the nosebowl, I guess, will create a good enough seal if the ramp is rigid enough. I am guessing that Comanche's ramps are way more rigid than mine due to that opposed curve.
So where are we at with all this?
Remo probably built this noseramp himself. It looks very custom. It's too thin and doesn't have rigidity - ram air will flex bend it "into" the cowling. It's not sealed properly practically along all of that bottom edge between the bowl and the ramp.
The only hope for it is that it's aerodynamic-ish and looks like a "dozer blade" - curved up. Maybe the nosebowl lip deflects the air enough for it not to go under too much:
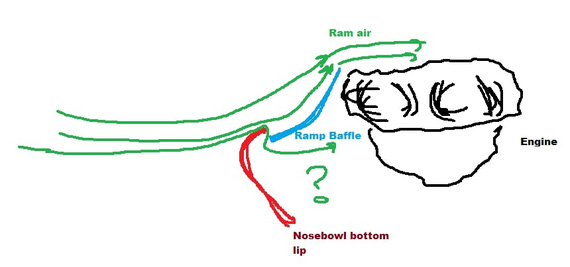
Airflow diagram
Can I replace the current rubber seal with felt?
Maybe. The front of the engine moves. The ramp's aluminum is very light - I am afraid that if I were to add any reasonable quantity of felt to it to hold the seal tight it will warp the aluminum via relative motion of that ramp (hooked up to the engine) rubbing on the bottom of the nosebowl. Or worse yet, make a hole in the bowl.
Can I replace the ramp? Well, everything's possible; but that's a massive undertaking. That ramp / nose baffle, Comanche-style, has that compound curve, and I don't have time or skill to do it fast. 2 months? Maybe, if I get lucky. BTW this is probably why Remo did it this way - because his is just an aluminum sheet, wrapped around the front of the engine, "neck cone" style, and cut to fit.
So, what do I do?
After discussing this at length with my good friend Ben, we settled on testing this out first to see how bad the air flow going "under" will be. I can mark the bottom of the nosebowl with some tinted oil, and go fly. Oil streaks will tell me if the air is flowing under a lot, or not so much.
I'll also replace all the other baffle seals, which will improve cooling. There's a lot of gaps to RTV, too.
I don't want to replace the bottom nosebowl ones, because actually there the rigidity of old neoprene rubber seals should help...
The three best things in life are a good landing, a good orgasm, and a good shit. A night carrier landing is one of the few opportunities to experience all three at the same time.
Up ↑
Annual 2019: The Rest of April
...and 1/2 of May
| On: | May 14, 2019 |
| In: | [Chickenhouse Charger] 2019 Annual |
| Tags: | 6781G, MA5 Charger, Annual, Rotec TBI, baffles, prop, fabric |
Well, as usual, I got too focused on the plane and the mess I got myself into; and didn't log things as they went...
I will split the notes in multiple posts; by theme / subject. Just general notes here.
Annual, Continued
We got together with John, my IA, and continued working on the plane early April.
We pulled the prop, so that I will have access to baffles (I wanted to redo them).
John re-riveted the air takeoff flange back to the front ramp.
Meanwhile, I started disassembling the fuel system to get to the screens, including the oil sump screen, and clean them.
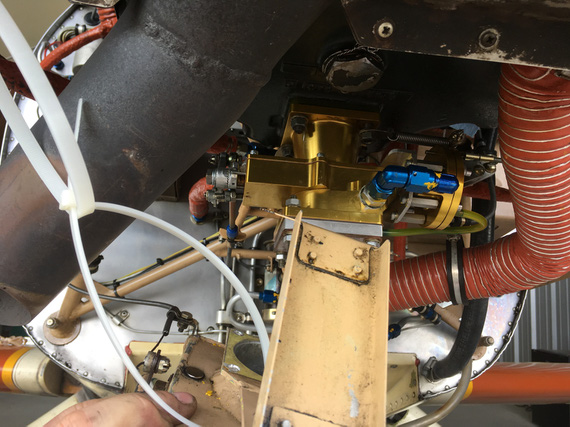
Airbox off
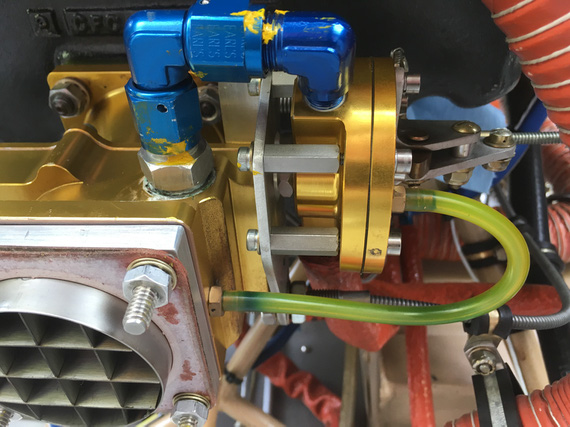
TBI intake airflow straightener
Okay, stop right there. See that fuel inlet, right above the air intake? See the little smudge of dope around the inlet fitting? Yep. Teflon dope. Rotec explicitly tells you not to put ANYTHING on there - there's a copper crush gasket behind that fitting.
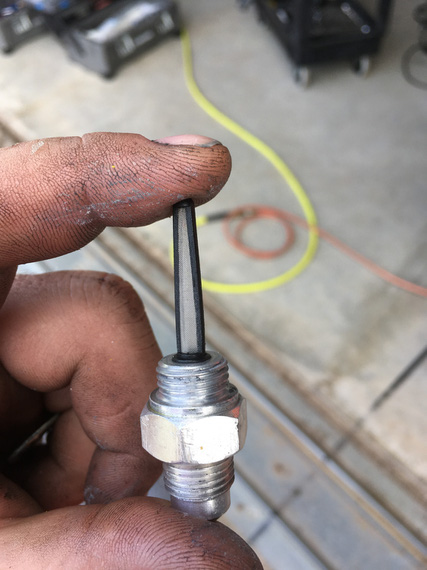
TBI screen
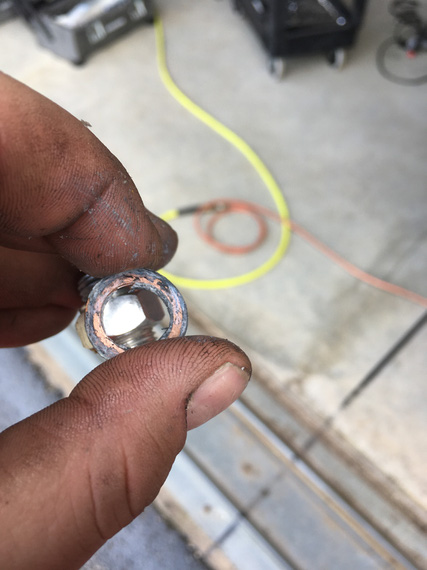
TBI crush gasket
See all that dope above? Okay, that thread on the TBI is a female thread. Dope will be all in it, and guess what will happen when I screw the fitting back in? Yep. It'll go into the TBI fuel galleys. Right to where that spray bar is with tiny little holes in it. Not Good (c).
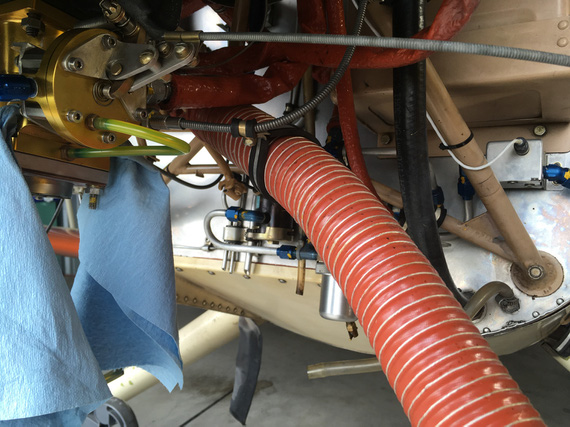
TBI holes plugged
Intakes
I noticed evidence of possible intake leaks, so without "burping" the engine, decided to pull the intakes and replace the gaskets. This is my karma. I did that on the Cheetah just a year ago, and scraping remnants of one of those gaskets and re-chasing the threads took me about 10 hours; maybe more.
Also: interesting note: she has intake tube clamps on studs and not bolts like every other Lycoming I've seen. Old, narrow-deck cylinders :).
Prop
When we pulled it, bolts were in the thru holes on the wooden prop really tight.
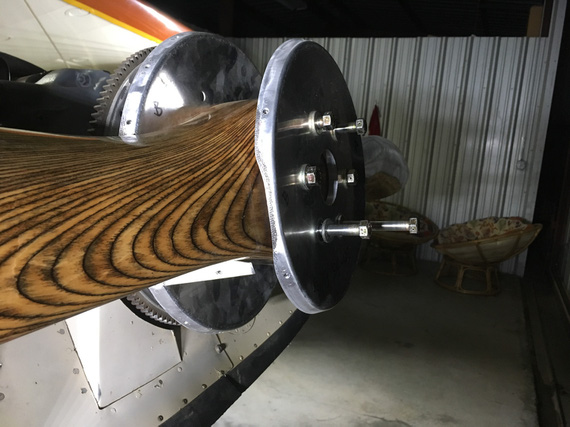
Pulling the prop
She has the prop made by Frank Johnson of Performance Propellers fame, and after contacting him, he just suggested to re-drill the holes and re-coat them inside with something.
Well, I got me a 29/64 (1/64 oversize) reamer, and went to town.
But first, I needed a rack.
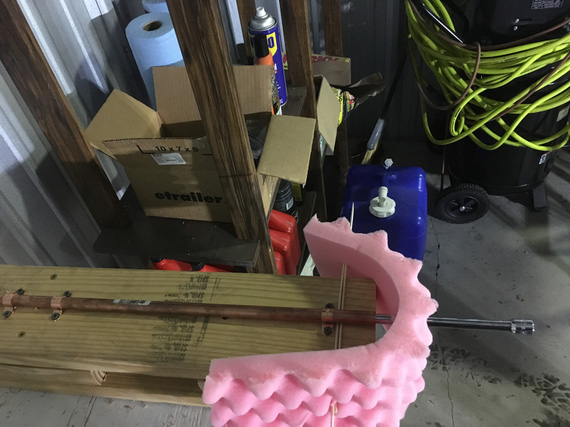
My prop rack
Built with a 1/2" pipe, some foam, pipe brackets, screws, 2x6s screwed to the table, and my 3/8" drive extension rod. You get the idea :). Redneck engineering galore.
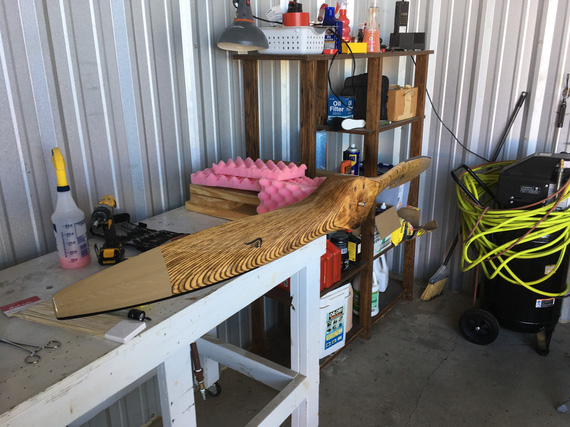
Prop on the rack
This whole thing was happening over a few days by the way; and when I finally got my reamer and had time to deal with it, the holes.. extended. Wood moves!
Hey, we had much rain then, and prop "swelled" a bit methinks.
But I still decided to fill the holes as much as I could.
Even got me some nice scales for mixing System Three ClearCoat.
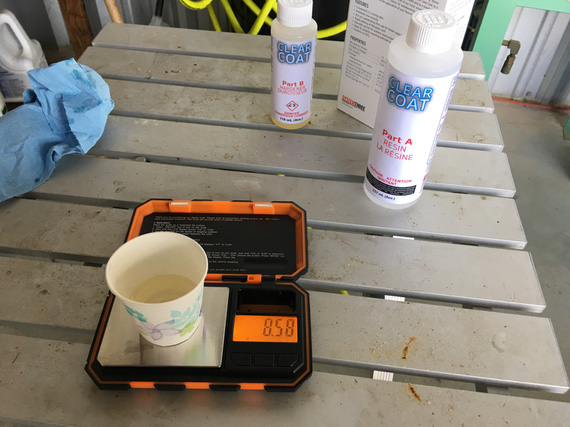
Mixing
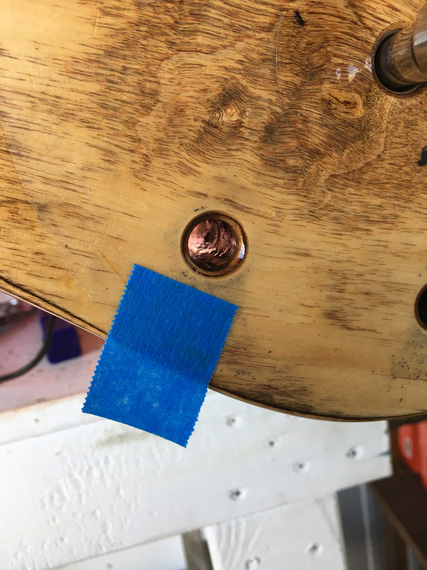
A filled hole
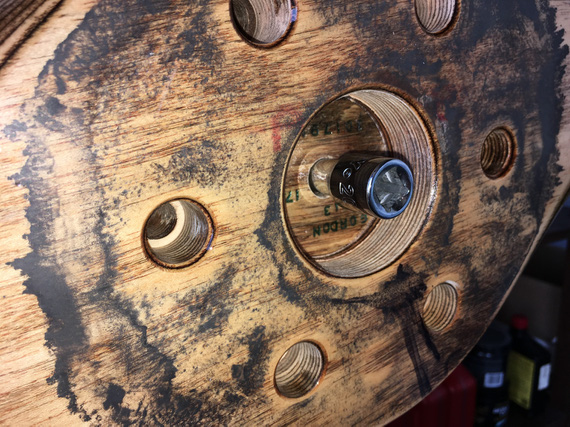
Backside
Fabric
Fabric on this plane is old. Flyable from what I am being told by experts, but old. Cracking, peeling paint.
Original logs say that she was covered in Polyfiber. But the current finish looks more like Imron and the company - "flexible" automotive poly. It's cracking and peeling around areas of high wear (prop wash, etc).
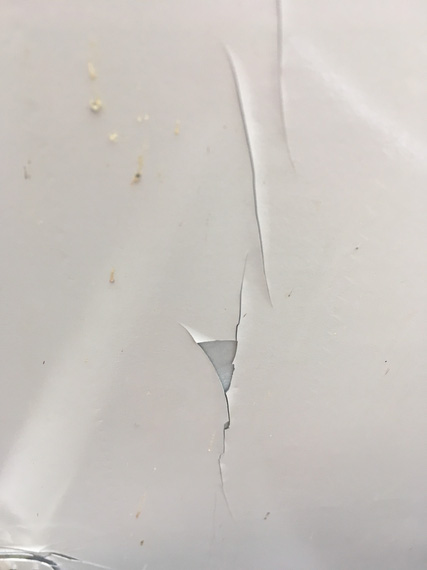
Sad fabric
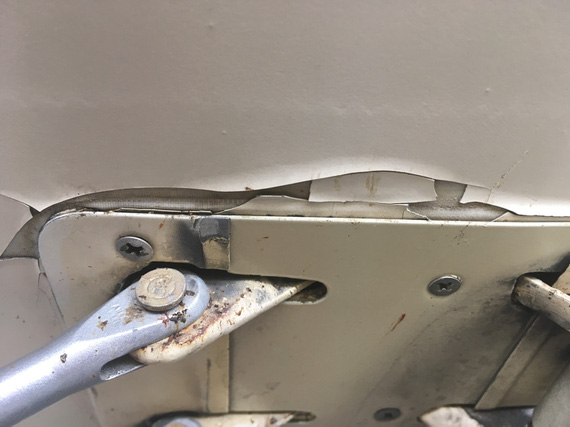
Sad, sad fabric
John (my IA) wanted to take a Maule fabric tester to it; but I didn't want holes in my wings.
I discussed this with a few guys that worked with fabric their whole lives, and we came to a consensus that for now this is fine. Will just fill with silver, and keep on flying. Incidentally, that's what Glenn has been doing, too.
Full Stop
I worked on baffles a bit, but then, everything went downhill. We'll talk about baffles in the next post. And the downhill part, afterwards :).
"Expect lower at the end of this transmission."
-ORD ATC
© Copyright "79FT". All rights reserved. Feel free to cite, but link back to the pages cited.
This website only shows how I did things in my various projects. These pages are for information and personal entertainment only and not to be construed as the only way, or even the perceived correct way of doing things. You are responsible for your own safety and techniques.
